
Something Important if You Don’t Want to Waste Time
Although many of you use applications such as Lightroom to catalogue and organise your photographs, today I’m going to explain my own workflow for organising, classifying, storing and managing photo files properly.
I like to know exactly where every file is at all times and, just by looking at a filename, have a good idea of what it contains.
I handle all my file management with Total Commander, and I can honestly say that it is very difficult to beat in terms of speed and reliability. I do almost everything using the keyboard, and once you become familiar with it, the workflow is incredibly fast. It takes some time to get used to, but after that you probably won’t want to use anything else. On Mac, I run it in a virtualised environment.
Here are the main stages of my file workflow:
RAW DOWNLOAD AND STORAGE
I always shoot in RAW.
I download the RAW files either by cable to the laptop I usually take with me on shoots, or directly from the CF card using a card reader connected to the main computer where I do most of my processing.
In either case, the files are stored in a directory structure similar to this:
MASTERAW

|--- Sessions
|    |--- 2012
|    |--- 2013
|         |--- 0603 Wheat Field

|--- Portfolios
|    |--- 2012
|    |--- 2013

|--- etc...
The folder structure is divided first by type of work: creative sessions, portfolios, weddings, commercial work, product photography, travel and so on.
Within each category, folders are organised by year, and inside each year I create a final folder containing the month and day of the shoot together with a short description.
This system does not depend on any particular software. It can be accessed from any computer and makes it easy to understand how the photographs are organised.
This RAW directory structure should be duplicated on at least two hard drives: one close to the computer you work on, whether PC or Mac, and another stored in a different physical location from the other copies.
CLASSIFICATION
Using software that allows photographs to be labelled by colour, I classify the images.
I prefer colour labels because they are one of the fastest and most intuitive ways to organise photographs.
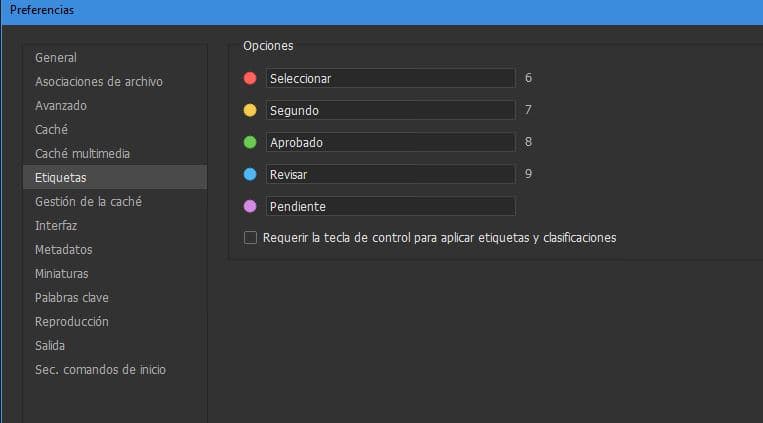
I use Adobe Bridge, which can be configured so that pressing keys 6, 7, 8 and 9 assigns a colour directly to the selected photograph.
Photo pending: colour labels [etiquetascolores.jpg]
I use the following colour system:
RED: Valid photograph, potentially suitable for editing
YELLOW: Photograph selected and waiting to be edited
GREEN: Photograph already edited
BLUE: Photograph selected by a third party, potentially suitable for editing
After enough time has passed since the shoot, I sort the collection by colour and delete the RAW files that have no colour label assigned.
This allows hard-drive space to be used much more efficiently.
EDITING
From Bridge, I open the photograph in Camera Raw, or copy and paste the adjustments from one image to others.
I adjust the required parameters in Camera Raw and, when necessary, open the photograph in Photoshop.
For large batches, such as some parts of wedding photography, I generate the JPG files directly by copying and pasting adjustments and then processing the files in batches through Bridge or Camera Raw.
For photographs that require additional work in Photoshop, I save a TIFF file in the same location as the RAW file.
But one important detail: I save the TIFF without applying final sharpening.
I also save in TIFF rather than PSD because TIFF is not tied to Photoshop in the same way, can offer efficient compression and still allows me to preserve layers, fonts and the operations I may need if I want to return to the photograph in the future.
And, of course, I save the TIFF in 16-bit.
So inside MASTERAW I keep the CR2 files, the XMP sidecar files — I never use DNG — and, where necessary, the TIFF files.
I do not save a TIFF for every photograph. I only keep one when the image involves interesting or extensive editing operations, which represents a relatively small percentage of the total photographs.
JPG GENERATION
Once the photograph is finished, whether through Photoshop or generated as part of a batch process, it will already have been converted to 8-bit and sharpened appropriately.
At that point, we have files such as:
IMG_8953.jpgI then move all the finished files from the same session into a folder structure similar to the RAW archive, but located in a separate area that I call “My Pictures”.
This folder structure is also organised by type of session and date.
It contains the final JPG files, which should never need to be opened and edited again. Any further editing should be carried out from the 16-bit TIFF file without final sharpening.
I rename all JPG files so that the filename provides more information and to prevent duplicates caused by using several cameras or by the camera’s image counter rolling over.
My naming system follows this pattern:
IMG_XXXX.jpg ---> AACXXXX.jpgWhere:
AA is the code identifying the camera that created the file.
C indicates the camera counter cycle.
You could also use two digits for the counter cycle if you expect to take more than 100,000 photographs with the same camera, as many professional cameras are designed to exceed 150,000 shutter actuations.
I rename the files using a batch renaming tool, such as the one included in Total Commander.
This means that when I see a filename such as:
0583344.jpgI know which camera took it — camera 05 — and that it was created during the eighth counter cycle. From that alone, I can roughly tell when the photograph was taken.
I also add one or two characters at the end of the filename when necessary to indicate special versions:
P — Panoramic image
BN — Black and white
B — Second version of the same photograph
For example, a panoramic photograph could be named:
0571250P.jpgAnd, of course, this JPG archive should also have at least two backup copies, with one of them stored in a different physical location.
I hope this workflow is useful to you.
Conversation